Step 16. Check Alignment of the Motherboard with the Standoff
Holes
Position the motherboard in the case so you can the alignment of the mounting
holes in the motherboard with the standoffs.
Note: It is best to install the processor module in the motherboard
before you install the motherboard in the case. Unfortunately,
this is not possible with some motherboards. If you can install
your motherboard in the case with the processor module on it,
go to Step 26 and complete through Step 33. Then return to this
step to install the motherboard in the case with the processor
module on it.
When you are installing the processor module outside the case,
use an antistatic mat or other soft surface under the motherboard.
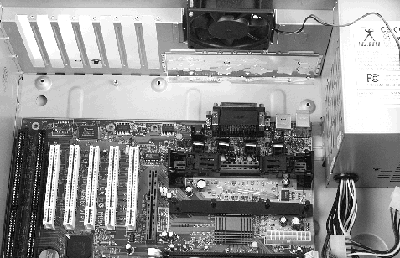
Photo 27. Check Alignment of Motherboard with Standoff Holes
top
Step 17. Install Motherboard on Standoffs
and Tighten Screws
Install the motherboard using the screws that were supplied with your case as shown in Photo 28.
Do not overtighten the screws. Gentle pressure is sufficient.
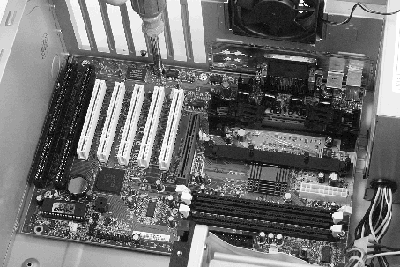
Photo 28. Install Motherboard on Standoffs and Tighten Screws
top
Step 18. Installing Memory on the
Motherboard
Be sure to check the reference manual for your motherboard for a list of recommended memory devices for your motherboard. If this information is not in the reference manual, check the motherboard manufacturers web site.
Memory for the AMD Athlon processor motherboards comes in DIMM (dual in-line memory module) modules or sticks. Photo 29 shows two DIMM sticks.
Do not handle the DIMM sticks by the edge connectors.
The DIMM sticks have notches that align them to the memory sockets.
Consult the reference manual for your motherboard to determine the correct
installation sequence for the memory. Usually you should install the first stick
in socket 1 and the second in socket 2 and so on. However, your motherboard
may have special requirements, so check the manual.
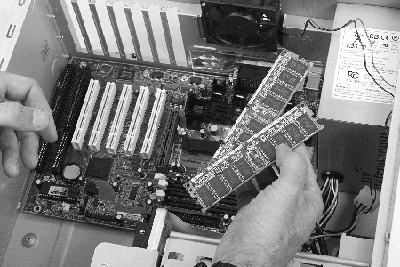
Photo 29. Two DIMM Memory Sticks
top
18 Continued, Inserting the DIMM Stick
in the Motherboard
-
The first step to installing the DIMM stick is to open the levers on the left and right of the memory socket as shown in Photo 30.
-
Using the notches in the DIMM stick, properly orient the stick to the memory socket.
-
Using a straight down motion, insert the DIMM stick into the memory socket and seat it firmly.
-
The locking levers will close automatically when you have properly seated the DIMM stick.
Photo 30 shows a DIMM stick being installed with the notches properly aligned and the locking levers open.
To remove DIMM sticks, pull the locking levers out, and the stick will pop
out of the socket.
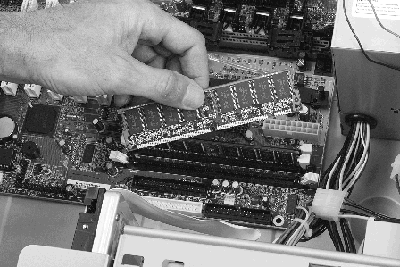
Photo 30. Installing a DIMM Memory Stick
top
Step 19. Install the AGP Graphics Card
To get the full benefits of the AMD Athlon processor you need
to install components with equivalent performance levels. Therefore, AMD recommends
an AGP graphics card to provide the best performance for your new AMD Athlon
processor-based system.
To bring the system up initially, configure the system with the minimum necessary
components. The first (and only) card to be installed is the AGP graphics card.
With processor, memory, drives, and graphics, the system will start and run.
A basic configuration minimizes troubleshooting in case of problems.
Insert the AGP card into the dedicated slot. This card fits into only one slot--normally
the slot nearest the processor. When the card is fully seated, install the hold-down
screw into the case.
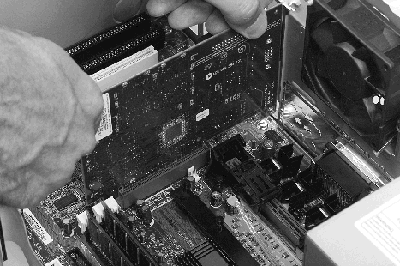
Photo 31. Install the AGP Card
top
Step 20. Connect and Route Power Cables
The first cable to install is the pass-through cable for the processor exhaust cooling fan. This cable has male and female connectors and is designed to go between the end of the power lead from the power supply and the power connector on one of the drives.
As you can tell from Photo 32, the ends of the power cables are very different. The cable can only be installed one way because of the keys.
Install this cable between the power supply and the CD-ROM drive. The CD-ROM
drive does not draw much power on a sustained basis.
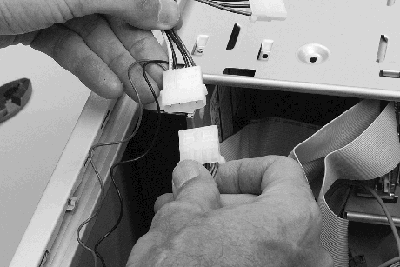
Photo 32. Power Cable Pass-Through for the Exhaust Fan
top
|


