About AMD Products Support AMD Home Search AMD Contact Us
AMD Home
navbarnavbar

Steps to Building the System

Before You Start Building

    Steps 1-5
  1. Your Computer Case
  2. If Necessary, Install the Power Supply
  3. Ground Yourself
  4. Install the Exhaust Fan
  5. Your Basic Startup System


  6. Steps 6-10
  7. Remove Blocking Plates
  8. Get Familiar with Your Drive Cable Connectors
  9. Install the Drives
  10. Motherboard, Case, and Processor Module
  11. Motherboards With and Without Hinksink Support


  12. Steps 11-15
  13. Installing the Heatsink Support Assembly
  14. Remove the Heatsink Support Clip
  15. Verify Motherboard Jumper Settings
  16. Prepare the Punchout Access Ports
  17. Preparing to Install the Motherboard in the Case


  18. Steps 16-20
  19. Check Alignment of the Motherboard with Standoffs
  20. Install Motherboard on Standoffs and Tighten Screws
  21. Installing Memory on the Motherboard
    18 Cont. Inserting the DIMM Stick in the Motherboard
  22. Install the AGP Graphics Card
  23. Connect and Route Power Cables


  24. Steps 21-25
  25. Install the Remaining Power Cables
  26. Install the Primary and Seconday IDE Cables
  27. Install Floppy Drive Cable
  28. Install Tiewraps on All the Cables
  29. Clear the Airflow by Rerouting Cables


  30. Steps 26-30
  31. Processor Installation
  32. Place the Heatsink Clip in the Heatsink Fins
  33. Install the Fan Power Cable
  34. Slide the Processor Module into the Guides
  35. Firmly Seat the Processor Module


  36. Steps 31-35
  37. Lock the Processor Module
  38. Install the Heatsink Support Clip
  39. Check the Processor Module Installation
  40. Install Feet on Enclosure
  41. Install the Keyboard and Mouse Cables


  42. Steps 36-40
  43. Install the Monitor Cable
  44. Verify the 115/250 Setting
  45. Install the Line Power Cable
  46. Start Your System
  47. Load the Operating System


  48. Steps 41-43
  49. Install Additional Cards and Devices
    41. Cont. ISA and PCI Card Options
    41. Cont. Two Modems
    41. Cont. AGP and PCI Video
  50. Secure the Cards
  51. Periodically Check on Driver Updates
    43. Cont. Notes
    43. Cont. Final Walk-Through
 

Year 2000 Information
Image Description

Step 31. Lock the Processor Module

Pull out the retention latches located at the top corners of the processor module as shown in Photo 43 until they click into place and lock. Do this to both sides of the processor module.


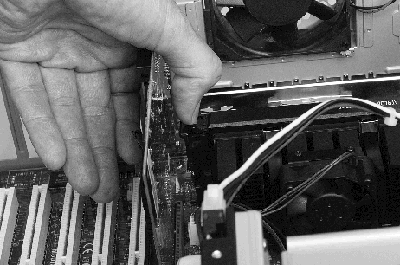
Photo 43. Lock the Processor Module

top

Step 32. Install the Heatsink Support Clip

Slide the heatsink support clip onto the grooves on the heatsink support as shown in Photo 44. The clip should snap into position.


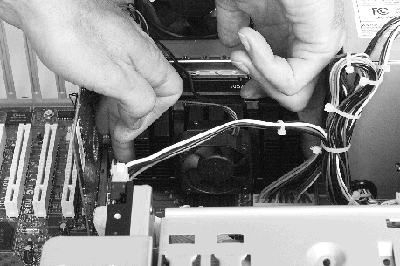
Photo 44. Install the Heatsink Support Clip

top

Step 33. Check the Processor Module Installation

When you are finished, the processor module should look like Photo 45. Notice the relative location of the processor module case and retention brackets. If properly installed, the processor module will be securely attached to the system board.


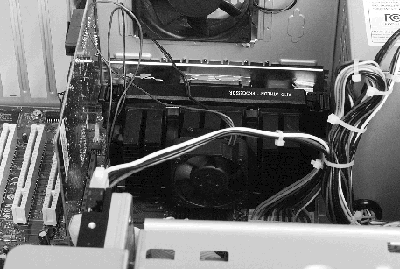
Photo 45. Processor Module Installed

top

Step 34. Install Feet on Enclosure

Install the feet on the bottom of the case. Photo 46 shows the backing paper being taken off the pressure sensitive adhesive on the back of the molded rubber feet. Install the feet in the center of the raised circle, as shown.

This procedure will vary for different cases. Check your case reference manual for additional instructions.


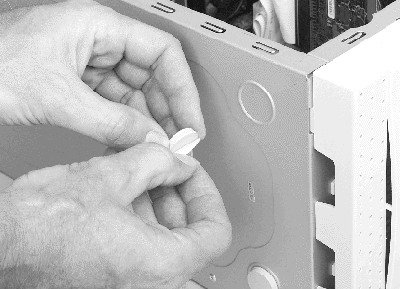
Photo 46. Install Feet on Enclosure

top

Step 35. Install the Keyboard and Mouse Cables

Check the connectors on the keyboard and mouse to if they are round or rectangular. Photo 47 shows the location of the round mini-DIN connectors on the back of the system. The round connector on the right has a mouse icon. The round connector on the left shows a keyboard icon. These connectors are keyed and can only be inserted one way.

Below the round mini-DIN connectors are two USB ports. If your input devices are USB devices (USB devices have smaller rectangular connectors), they are plugged into the USB ports. With USB devices, you can either daisy-chain them--plug one into the other--or they can go into separate connectors. Please check your keyboard/mouse manual for detailed instructions.


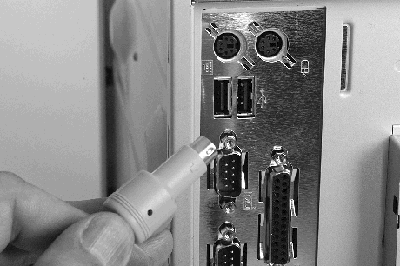
Photo 47. Keyboard and Mouse Cable Connectors

top


Home | Search | Contact Us | About AMD | Products | Support

©1999 Advanced Micro Devices, Inc.
Trademark Information