Step 1. Your Computer Case
The recommended
computer case that you buy can be a complicated mechanism.
Take some time to learn how to take the side panels off and put
them back on. It is a good idea to ask your salesperson to show
you how the case is disassembled and assembled--especially the
installation of the power supply.

top
Step 2. If Necessary, Install the Power
Supply
If necessary, install the power supply in your case as shown
in Photo 2, "Power Supply Being Installed". Secure the power supply
with screws and bolts as applicable as shown in Photo 3, "Screw
in the Power Supply".
Set the power supply to the correct voltage setting--either 115V
or 230V as shown in Photo 4, "Set the 115/230 Volt Switch". In
the United States we use 115V.
WARNING
Do not plug the power supply into a wall outlet until you have
completed all the steps of building your PC and you are ready
to turn it on for the first time.
AMD Athlon processor-based computer systems distribute power
to the motherboard whenever the power supply is plugged into the
wall. You can damage components by inserting them or removing
them from the system when the power supply is plugged in--even
when the system is turned off.
Always unplug the power supply from the wall outlet when you work
inside your computer system.
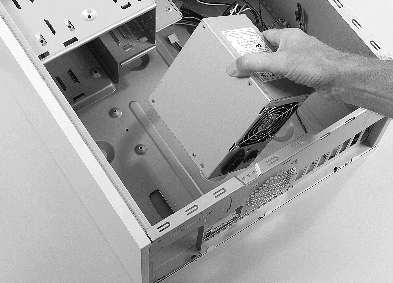
Photo 2. Power Supply Being Installed
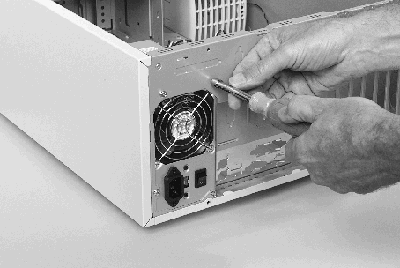
Photo 3. Screw in the Power Supply
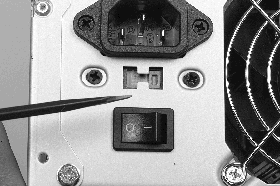
Photo 4. Set the 115/230 Volt Switch
top
Step 3. Ground Yourself
Use a wrist strap to ground yourself whenever you are working
on the internal parts of your computer. We recommend that you
purchase a wriststrap that plugs into a wall outlet and uses the
ground pin of the wall outlet to provide an earth ground.
Another type of wriststrap has an alligator clip on the end and
must be clipped to some grounded object. The computer case will
not provide a ground for this type of strap until the power supply
is plugged into the wall socket. Because we don't recommend that
the power supply be plugged into a wall socket until you have
completed the assembly process, you must connect the alligator
clip to some other metallic source of ground.
Electrostatic discharge (ESD) damage to electronic components
can be cumulative. Each time a part gets zapped, it can be damaged
enough so that it will fail before its normal lifetime. You can
avoid any problems like this with your computer system by using
a ground strap.
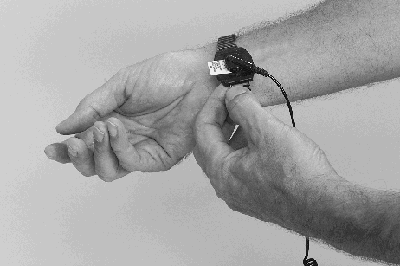
Photo 5. Ground Yourself
top
Step 4. Install the Exhaust Fan
We recommend that you install an exhaust fan in the back of
the case. The recommended case list is in the Recommended
Enclosure List. If an exhaust fan can be installed in the
case, we recommend that you install one.
The exhaust fan must be installed in the rear of the case, drawing
air out of the inside of the case. The arrows in Exhaust Fan in
the Rear of the Case show the required direction of the airflow
from the fan.
The fan should be positioned as closely as possible to the location
where the processor module will be installed on the motherboard.
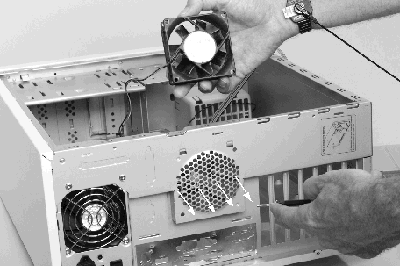
Photo 6. An Exhaust Fan in the Rear of the Case
top
Step 5. Your Basic Startup System
For your basic startup system you should install a floppy disk
drive, a CD_ROM drive, and a hard disk drive. After you have the
basic system installed and working with your operating system
and some applications, you can come back and install additional
drives or other devices.
Get these components ready to install in the case as shown in
Photo 7., "Basic Startup System".
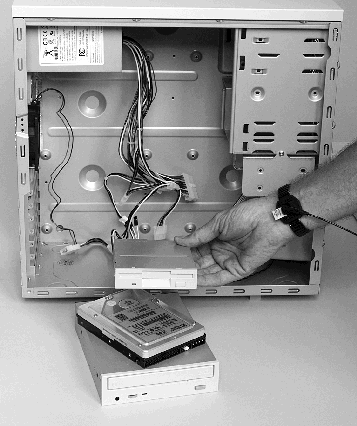
Photo 7. The Basic Startup System
top
|


